The Project Manager is used to manage the data of existing projects, and helps to locate, open, copy, delete and/or rename desired projects or their input or output data.
A Project represents any particular problem to be solved by HYDRUS. The project name, as well as a brief description of the project, helps to locate a particular problem. Projects are represented by a file project_name.h3d3 that contains all input and output data. HYDRUS input files (used by the computational modules) are extracted from the project_name.h3d3 (the final 3 refers to version 32 of HYDRUS; extension h3d was used with version 1.0 and h3d2 with version 2.0) file into a working subdirectory; output data created by the calculation module are sent into the same folder. When saving a project, output files (created by the computational modules) are also included into the project_name.h3d3 file. The input and output files can be either permanently kept in an external working directory, or stored in this folder during calculations (the check box Keep results and temporary files in external directory). The location of the external working directory is specified in the Program Options dialog window.
The Project Manager dialog has two tabs: the Project Groups Tab and the Projects Groups Tab.
The Project Manager gives users considerable freedom in organizing their projects. The projects are grouped into Project Groups, which can be placed anywhere in accessible memory (i.e., on local and/or network hard drives). Project Groups serve to organize projects into logical groups defined by a user. Each Project Group has its own name, description, and pathway. A Project Group can be any existing accessible subdirectory (folder). HYDRUS is installed together with two default Project Groups, 2D_Tests and 3D_Tests, which are located in the HYDRUS3D folder. The 2D_Tests and 3D_Tests Project Groups contain test examples for two- and three-dimensional problems, respectively. Additional Project Groups will be added as the options in HYDRUS expand. We suggest that users create their own Project Groups (e.g., the My_2D_Direct, My_2D_Inverse, and My_3D_Direct Project Groups), and keep the provided examples intact for future reference. Projects can be copied with the Project Manager only within a particular Project Group. Users can copy projects between Project Groups using standard file managing software, such as Windows Explorer. In that case one must copy only the project_name.h3d2 file. When temporary data are kept in the working directory (i.e., by checking the box Keep results and temporary files in external directory), the working directory must be copied together with the project_name.h3d3 file.
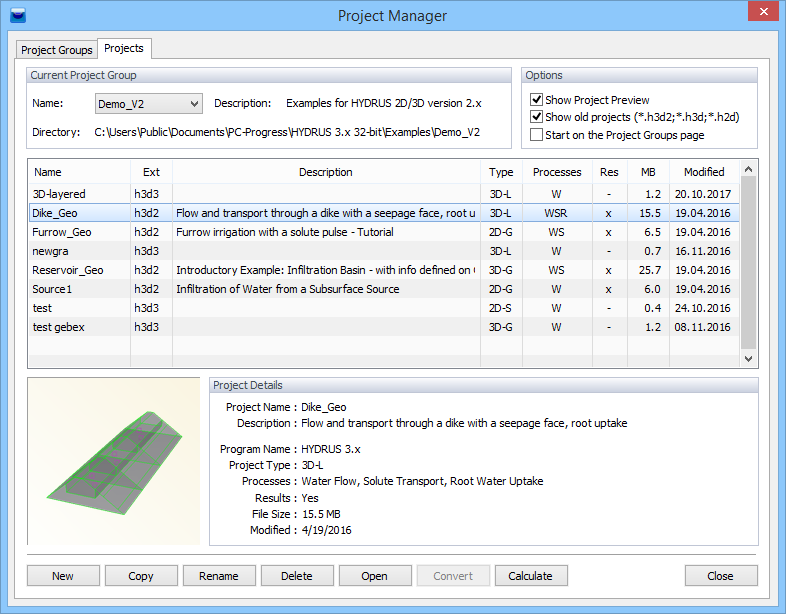
In addition to a Name and a brief Description of a Project, the Project Manager also displays dimensions for a particular problem (Type: dimensions are either 2D or 3D, and the Type of Geometry is either Simple (S), Layered (L), or General (G)), what Processes are involved (W – water flow, S – solute transport, T – heat transport, R – root water uptake, Inv – Inverse problem), when the project was created (Date) and whether or not Results exist. The Project Manager can also display a preview of the Project’s geometry (see the check box Show Project Preview). Commands in the Project Manager are listed below.
Commands in the Project Manager.
Group |
Command |
Description |
Project Groups |
New |
Registers a new Project Group in the Project Manager. |
Edit |
Renames the selected Project Group, changes its description and/or location. |
|
Remove |
Removes registration of a selected Project Group from the Project Manager. |
|
Set As Current |
Sets a selected Project Group as the active Project Group. |
|
Close |
Closes the Project Manager. |
|
Projects |
Creates a new project in the current Project Group. |
|
Copies a selected project within the current Project Group. |
||
Renames a selected project. |
||
Deletes a selected project. |
||
Open |
Opens a selected project. |
|
Close |
Closes the Project Manager. |
|
Convert |
Converts projects created by earlier HYDRUS versions (i.e., either HYDRUS-2D or version 1.0 of HYDRUS (2D/3D)). |
|
Calculate |
Calculates selected HYDRUS projects. This command allows users to calculate multiple selected projects simultaneously. |
The commands New and Rename from the Projects Tab of the Project Manager dialog window call the General Data dialog window, which contains the Name and Description of the project, as well as information about the Project Group (name, description, and pathway) to which the project belongs. It also contains information whether or not the input and output data are kept permanently in an external directory (the check box Keep results and temporary files in external directory).
Projects created by the previous version 2.0 of HYDRUS-2D can be imported into the current version of HYDRUS using two ways:
Input data can be edited either using the HYDRUS graphical user interface (this modifies directly the project_name.h3d3 file) or the input data can be modified manually. In such case, HYDRUS input files need to be stored in the working external directory (sent there by the command File->Export->Export Data for HYDRUS Solver), and then can be imported back into the HYDRUS project_name.h3d3 file using the command File->Import ->Import Input Data from *.In Files.
The Working Directory is a folder into which the program stores temporary data. Each open project has its own Working Directory where the program stores, for example, input files for computational modules, and where computational modules write to the output files. When saving a project, data from the Working Directory are copied into the main project file project_name.h3d3. When the project is closed, the Working Directory is deleted. Only when a user selects the option "Keep results and temporary files in external directory" is the Working Directory not deleted after closing the project, in which case the temporary data are not copied into the main project file.
Return to File Menu.
Back to HYDRUS Step by Step.